Craving a sweet and salty treat? Let me show you how to make chocolate covered pretzel rods that are as fun to create as they are to eat! Not only will you whip these up in no time, but you can also customize them to fit any occasion. With just a few simple ingredients and easy steps, you’ll impress your friends and satisfy your snack attack. Ready to dive in?
Why I Love This Recipe
- Perfect Balance of Sweet and Salty: The combination of chocolate and pretzels creates a delightful contrast that is simply irresistible.
- Easy and Quick to Make: This recipe takes minimal time and effort, making it perfect for last-minute treats or gifts.
- Customizable Toppings: With options for nuts and sprinkles, you can easily tailor these treats to your personal taste or occasion.
- Great for Any Occasion: These chocolate-dipped pretzels are perfect for parties, holidays, or simply as a fun snack at home.
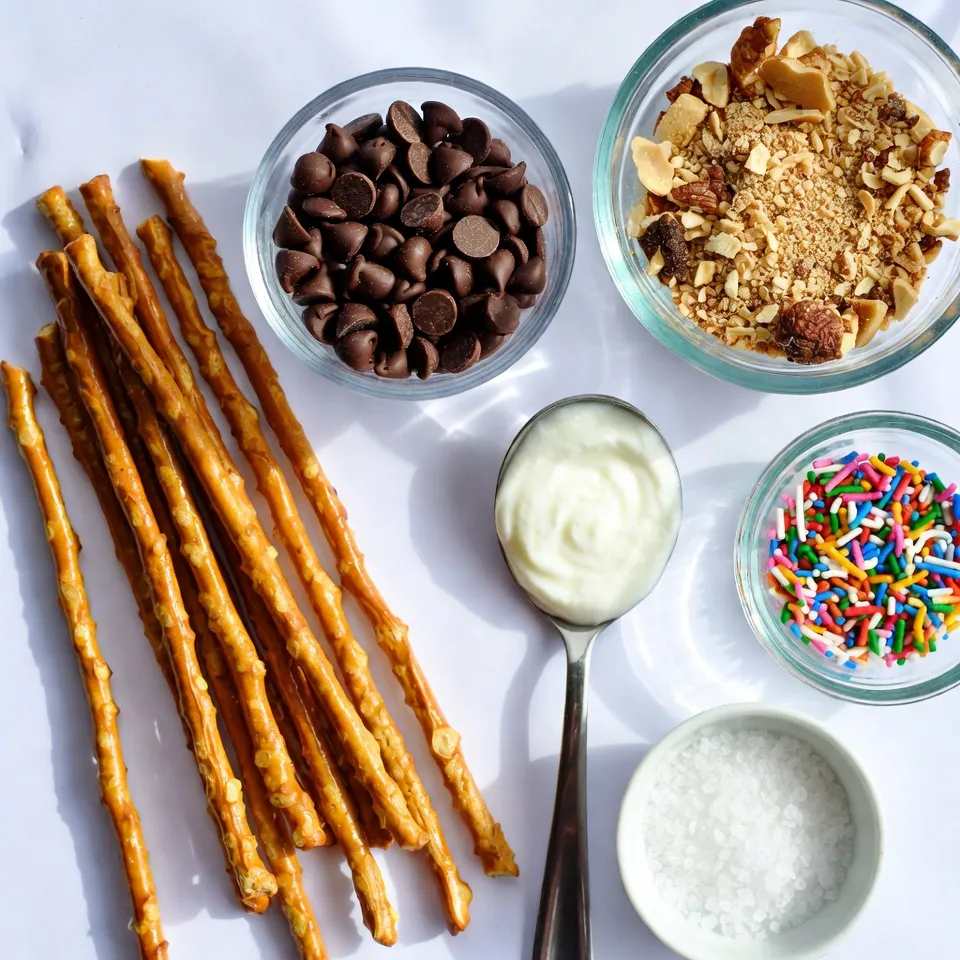
Ingredients
List of Ingredients
– 12 pretzel rods
– 1 cup chocolate chips (dark or milk)
– 1 tablespoon coconut oil
– 1/2 cup crushed nuts (almonds, peanuts, or hazelnuts)
– 1/2 cup colorful sprinkles
– Sea salt (optional)
Alternatives for Ingredients
If you prefer, you can swap out the pretzel rods for mini pretzels. You can also use white chocolate chips instead of dark or milk chocolate. For the nuts, you can try seeds like sunflower or pumpkin seeds if you need nut-free options. If you want a healthy twist, use dried fruit instead of sprinkles for a chewy texture.
Recommended Tools and Equipment
To make these treats, you will need a few simple tools:
– A microwave-safe bowl
– A baking sheet
– Parchment paper
– A fork or dipping tool (for dipping the pretzels)
– A small knife (to help with chocolate spreading if needed)
These tools will help you create perfect chocolate-covered pretzel rods that are fun and easy to make!
Step-by-Step Instructions
Preparation Steps
To start, gather your ingredients. You need 12 pretzel rods, 1 cup of chocolate chips, and 1 tablespoon of coconut oil. You’ll also want 1/2 cup of crushed nuts or colorful sprinkles. Grab some sea salt if you like a savory touch. Line a baking sheet with parchment paper. This step helps keep your pretzels from sticking. It also makes cleanup super easy.
Melting the Chocolate
Next, take a microwave-safe bowl. Add the chocolate chips and coconut oil. Heat the bowl in the microwave for 30 seconds. After each round, stir the mix until it’s smooth. This process usually takes 1-2 minutes. Be careful! The bowl will be hot, so use oven mitts when you take it out.
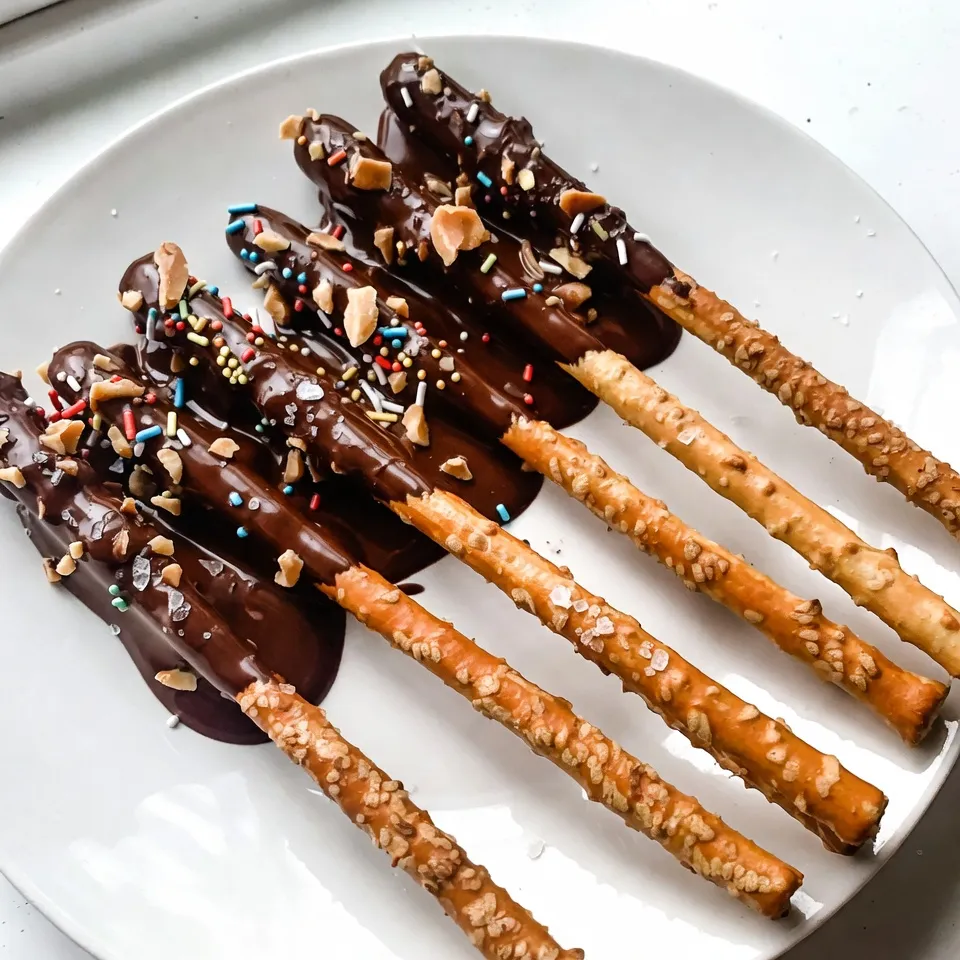
Dipping and Decorating the Pretzel Rods
Now comes the fun part! Take a pretzel rod and dip it into the melted chocolate. Coat about half of the rod, then let the extra chocolate drip back into the bowl. This helps avoid a chocolate mess. Immediately add your crushed nuts or sprinkles to the top half of the pretzel. Make sure to spread them out nicely. Place the dipped pretzel on your lined baking sheet. Repeat this for all the pretzel rods. If you like, sprinkle a little sea salt on each one before the chocolate hardens. This adds a great flavor contrast. Once all the rods are dipped, put them in the fridge for about 30 minutes. This helps the chocolate set. After they harden, enjoy your tasty treats or package them as gifts!
Tips & Tricks
How to Achieve a Smooth Coating
To get a smooth coating on your pretzel rods, use chocolate chips and coconut oil. The coconut oil helps the chocolate melt evenly. Heat the chocolate in short bursts in the microwave. Stir it well after each burst. This keeps the chocolate from burning. Dip the pretzel rods swiftly to avoid clumps. Let the excess chocolate drip off before adding toppings.
Storing Leftover Ingredients
If you have leftover chocolate, store it in an airtight container. Keep it in a cool, dry place. You can also refrigerate it, but let it come to room temperature before using it again. For leftover nuts or sprinkles, keep them in sealed bags. This way, they stay fresh for your next treat.
Enhancing Flavor with Sea Salt
Adding sea salt gives a nice contrast to sweet chocolate. Sprinkle a tiny pinch on the chocolate before it hardens. This brings out the chocolate’s flavor. You can also mix sea salt with nuts for extra crunch. It creates a delightful mix of sweet and salty that everyone will love!
Pro Tips
- Choose Your Chocolate: Experiment with different types of chocolate, like white chocolate or flavored varieties, to create unique flavor combinations.
- Chill the Pretzels: For an extra crunchy texture, chill the pretzel rods in the refrigerator for 10 minutes before dipping them in chocolate.
- Perfect Sprinkling: Use a small sieve to sprinkle nuts or sprinkles evenly over the pretzel rods, ensuring a beautiful and uniform coating.
- Storage Tips: Store the chocolate-dipped pretzel rods in an airtight container at room temperature to keep them fresh and crunchy for longer.
Variations
Different Chocolate Options
You can choose many types of chocolate for your pretzel rods. Dark chocolate adds a rich taste. Milk chocolate is sweet and creamy. You can even use white chocolate for a fun twist. Each type brings a unique flavor. Try mixing different chocolates for a layered look. The options are endless!
Unique Toppings and Combinations
Toppings can make your pretzel rods special. Use crushed nuts like almonds or peanuts for a crunch. Colorful sprinkles add a fun pop. You can also use mini chocolate chips for extra sweetness. For a savory touch, sprinkle sea salt on top. Mix and match these toppings to find your favorite combo.
Seasonal Theme Ideas
Make your pretzel rods fit the season! For Halloween, use orange and black sprinkles. At Christmas, add red and green toppings. You can also drizzle melted chocolate on top for decoration. For birthdays, use bright sprinkles and colorful candy. Let your creativity shine and enjoy the fun!
Storage Info
Best Practices for Storing Chocolate Covered Pretzel Rods
To keep your chocolate-covered pretzel rods fresh, store them in an airtight container. This helps protect them from air and moisture, which can make them soggy. Place parchment paper between layers if you stack them. This prevents sticking and keeps their fun look.
Shelf Life and Freezing Tips
Chocolate-covered pretzel rods can last up to two weeks when stored at room temperature. If you want to keep them longer, you can freeze them. To freeze, wrap each pretzel rod in plastic wrap. Then, place them in a freezer bag. They can stay fresh for about three months in the freezer. When ready to enjoy, let them thaw at room temperature.
How to Package for Gifting
Packaging these treats makes them perfect for gifts. Use clear cellophane bags to show off their colorful toppings. Tie each bag with a ribbon for a nice touch. You can also place them in a decorative box. Adding a personal note can make your gift even more special.
FAQs
How can I make chocolate-covered pretzel rods with white chocolate?
To make chocolate-covered pretzel rods with white chocolate, simply replace the chocolate chips. Use 1 cup of white chocolate chips instead. Follow the same melting and dipping steps as before. The process is just as easy, and the sweet flavor pairs well with the saltiness of pretzels.
Where can I buy pre-made chocolate-covered pretzel rods?
You can find pre-made chocolate-covered pretzel rods at many stores. Check local grocery stores or specialty candy shops. Online retailers like Amazon also sell them. Look for brands that use quality chocolate for the best taste.
Can chocolate-covered pretzel rods be made ahead of time?
Yes, you can make chocolate-covered pretzel rods ahead of time. They stay fresh for about a week when stored correctly. Just keep them in an airtight container at room temperature. Avoid humidity to keep the chocolate from getting soft.
What is the best way to melt chocolate for dipping?
The best way to melt chocolate is in a microwave. Use a microwave-safe bowl and heat in 30-second bursts. Stir well after each interval. This method helps prevent burning and gives you a smooth, creamy chocolate for dipping.
You now have a complete guide to making chocolate-covered pretzel rods. We covered the best ingredients, tools, and step-by-step methods. I shared tips for smooth coatings, flavor upgrades, and unique variations to try. Proper storage and packaging make these treats last and look great as gifts.
Use this knowledge to create your delicious snacks. Enjoy the process, and have fun experimenting with different flavors and theme