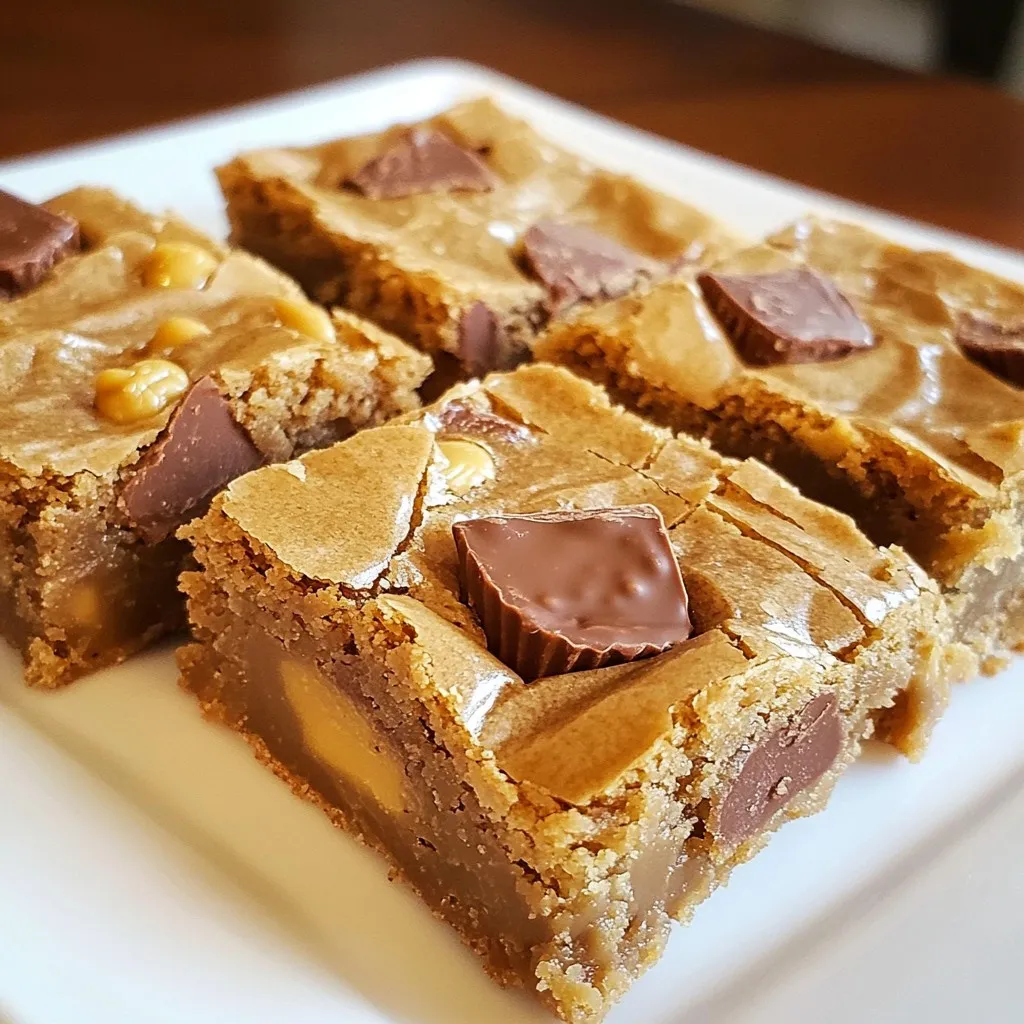
Get ready to satisfy your sweet tooth with my Peanut Butter Cup Blondies recipe! These soft and chewy treats blend creamy peanut butter with rich chocolate for a flavor explosion that’s hard to resist. You’ll find the step-by-step guide simple to follow, plus tips to achieve the perfect texture. So roll up your sleeves, and let’s whip up a dessert that will impress everyone! Ready to dive in?
Why I Love This Recipe
- Decadent Flavor: These blondies are packed with rich peanut butter and melty chocolate, creating a dessert that’s utterly indulgent.
- Easy to Make: With simple ingredients and straightforward steps, you can whip up these blondies in no time, making them perfect for any occasion.
- Customizable: You can easily modify this recipe by adding nuts, different types of chocolate, or even a sprinkle of sea salt on top for an extra flavor boost.
- Perfect for Sharing: Cut them into squares for a crowd-pleasing treat at parties, potlucks, or family gatherings that everyone will love.
Ingredients
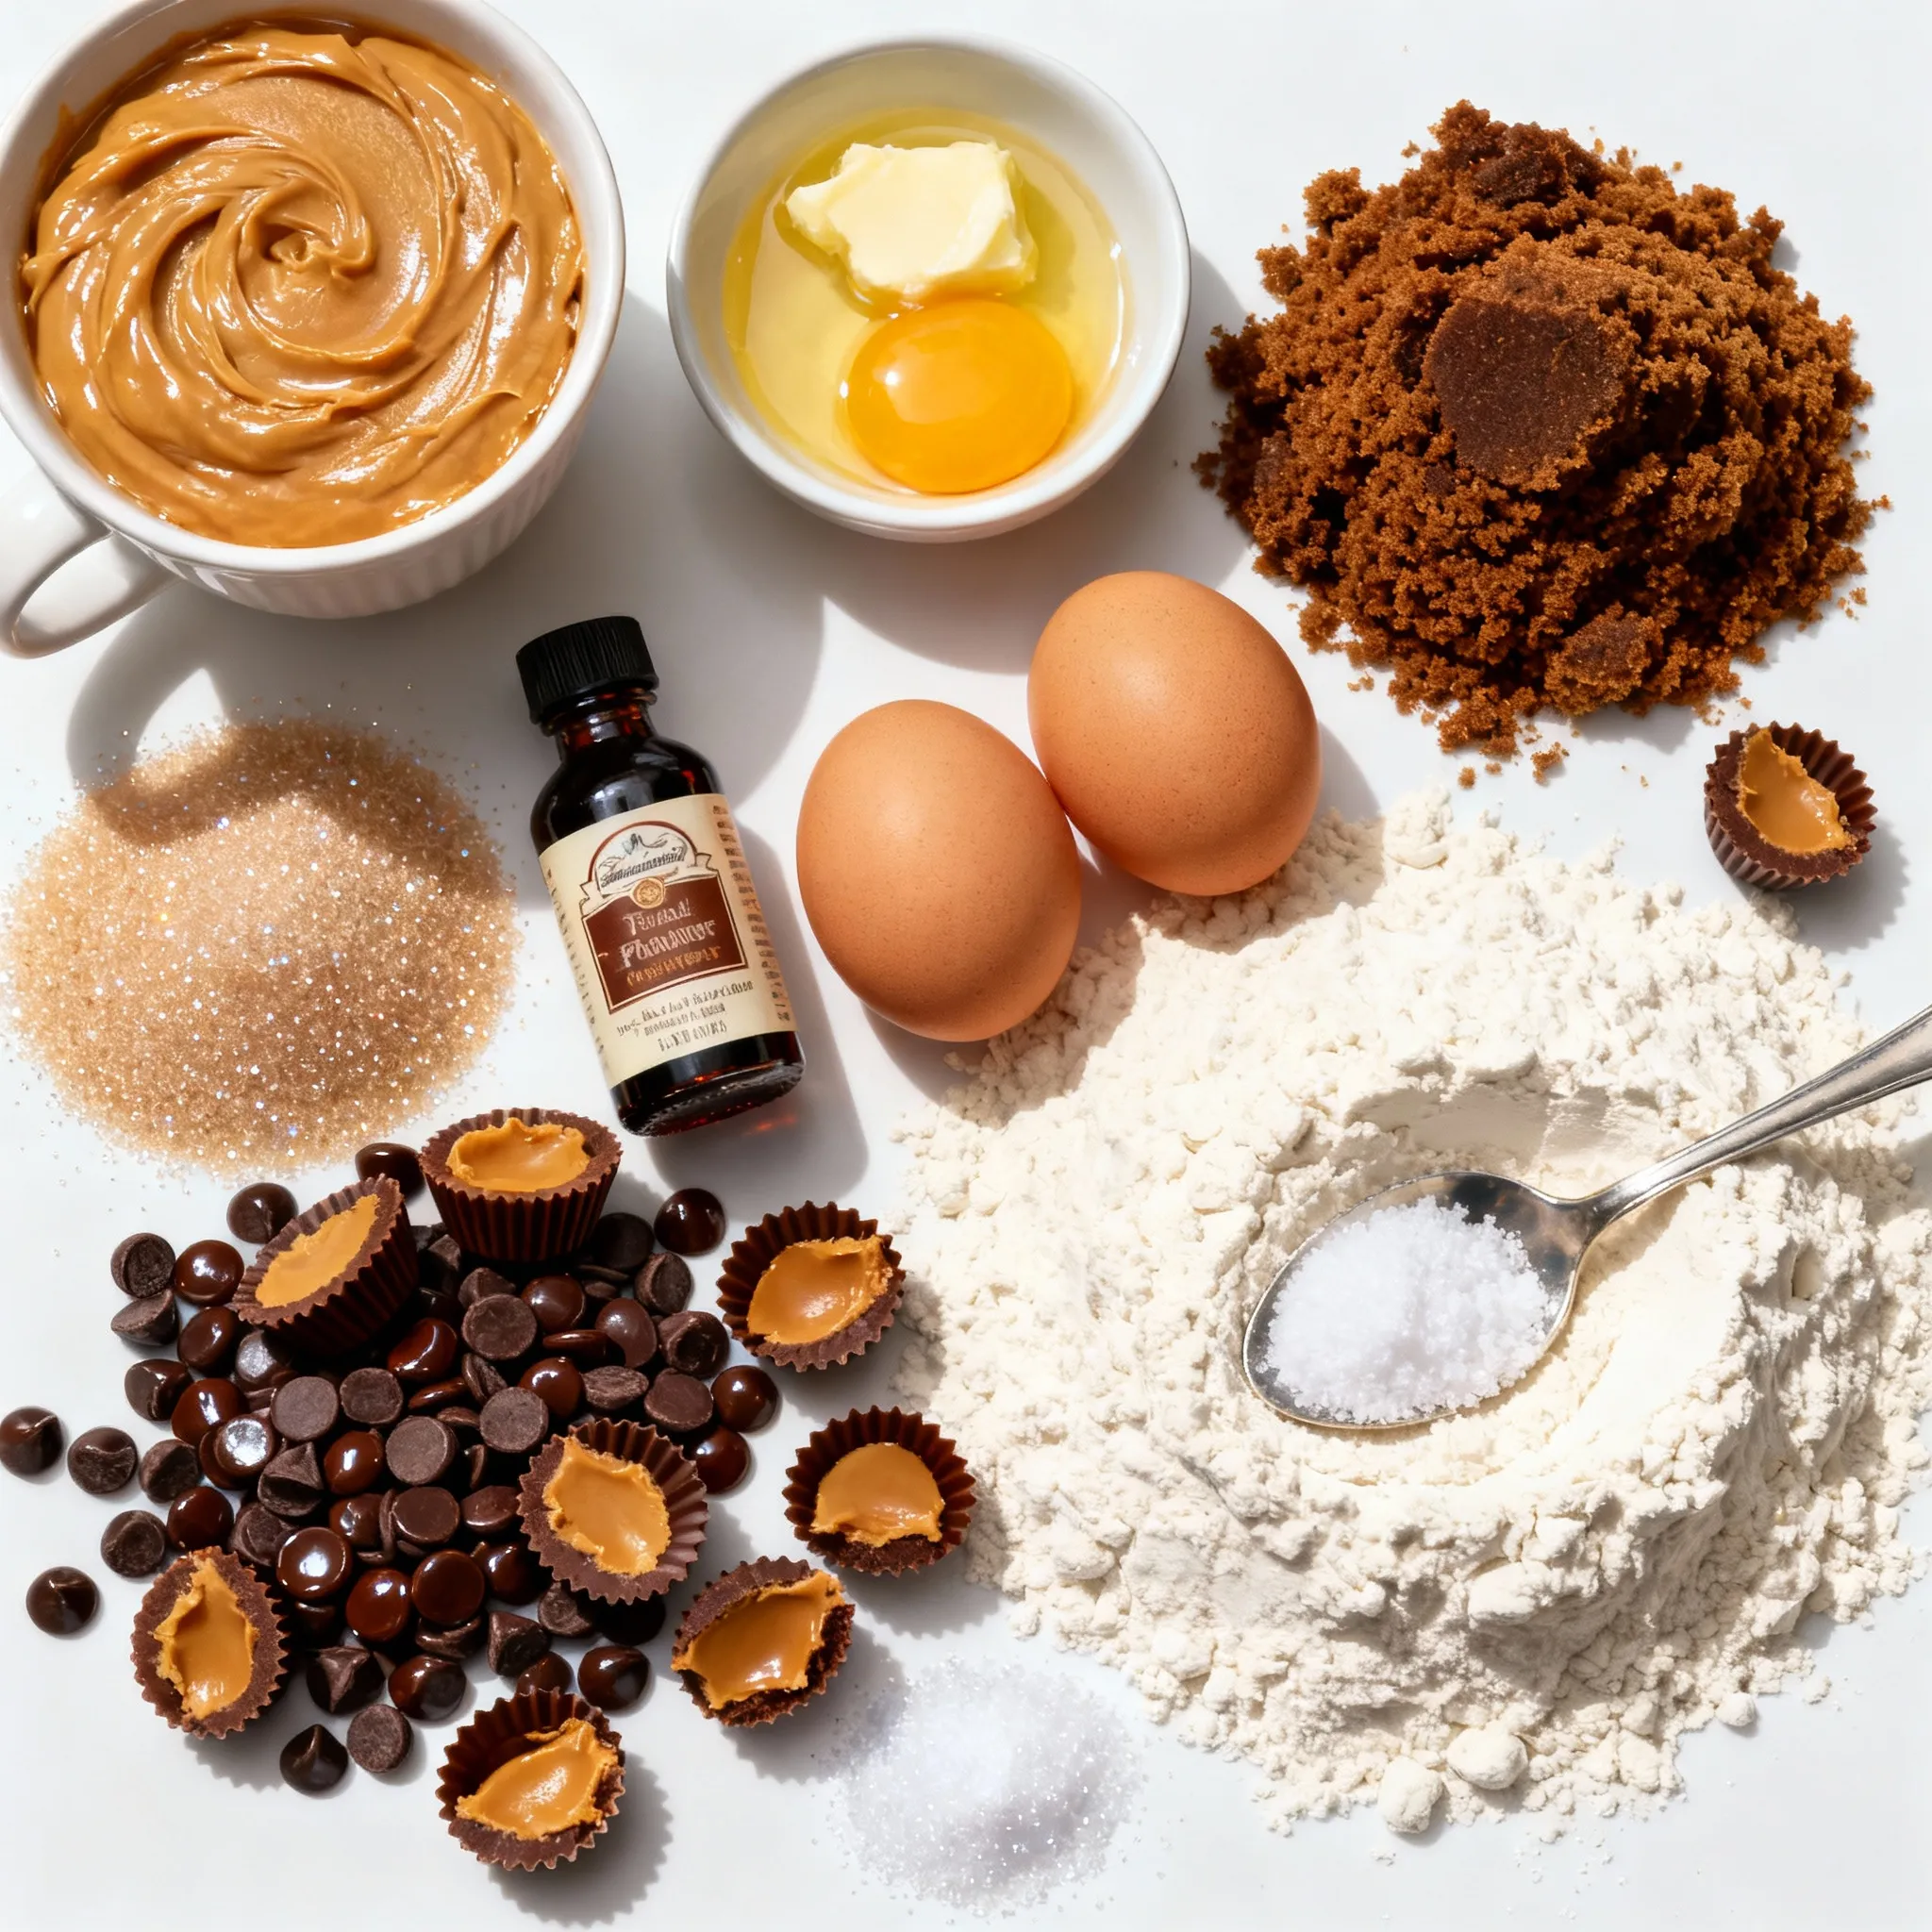
List of Ingredients for Peanut Butter Cup Blondies
– 1 cup creamy peanut butter
– 1/2 cup unsalted butter, melted
– 1 cup brown sugar, tightly packed
– 1/2 cup granulated sugar
– 2 large eggs
– 1 teaspoon vanilla extract
– 1 1/2 cups all-purpose flour
– 1/2 teaspoon baking powder
– 1/4 teaspoon salt
– 1 cup mini peanut butter cups, cut in half
– 1/2 cup chocolate chips
Special Ingredients Notes
Using creamy peanut butter gives these blondies a smooth texture. Make sure to use unsalted butter. This helps control the salt level. Brown sugar adds moisture and a rich flavor. Granulated sugar balances sweetness.
Substitutions for Dietary Restrictions
You can swap creamy peanut butter for almond or sunflower butter for nut-free options. Use vegan butter and flax eggs for a dairy-free version. For gluten-free blondies, replace all-purpose flour with a gluten-free blend.
Step-by-Step Instructions
Preparation and Oven Setup
First, preheat your oven to 350°F (175°C). This step warms the oven for even baking. While it heats, grab an 8×8 inch baking dish. Line it with parchment paper. Let some paper hang over the edges. This helps you lift out the blondies later.
Mixing the Wet Ingredients
In a large bowl, add 1 cup of creamy peanut butter and 1/2 cup of melted unsalted butter. Use a spatula or whisk to mix them until smooth. Then, add 1 cup of brown sugar and 1/2 cup of granulated sugar. Stir until there are no sugar granules left. The mix should be creamy and well-blended. Next, crack in 2 large eggs, one at a time. Beat well after each egg. Add 1 teaspoon of vanilla extract and mix again.
Combining Dry Ingredients and Fold Techniques
In a separate bowl, whisk together 1 1/2 cups of all-purpose flour, 1/2 teaspoon of baking powder, and 1/4 teaspoon of salt. Slowly fold this dry mix into your wet ingredients. Use a spatula to gently stir until they just combine. Don’t overmix! This will keep the blondies soft and chewy.
Baking Instructions and Cooling Tips
Now, fold in 1 cup of halved mini peanut butter cups and 1/2 cup of chocolate chips. Spread the batter evenly in the prepared dish. Bake in your preheated oven for 25-30 minutes. Check for doneness with a toothpick. It should come out clean or with a few moist crumbs. Once baked, let the blondies cool in the pan for 10 minutes. Lift them out using the parchment paper. Then, transfer them to a wire rack to cool completely before cutting. Enjoy these treats warm or cool!
Tips & Tricks
Achieving the Perfect Texture
To get soft and chewy blondies, mix the batter just enough. Overmixing can make them tough. Aim for a creamy mix without lumps. The right balance of peanut butter and butter gives great flavor and moisture. Using creamy peanut butter is key. It blends better and keeps the blondies soft.
Ensuring Even Baking
To bake your blondies evenly, preheat the oven to 350°F (175°C). Make sure to line your baking dish with parchment paper. This helps with removal and even cooking. Place the baking dish in the center of the oven. This position promotes uniform heat distribution.
Common Mistakes to Avoid
Avoid adding too much flour. Measuring flour properly is vital for the right consistency. Use a spoon to scoop flour into the measuring cup, then level it off. Don’t skip the cooling step. Allowing the blondies to cool in the pan helps them set. Finally, resist the urge to cut them too soon. Let them cool completely on a wire rack for the best results.
Pro Tips
- Use Room Temperature Ingredients: Allow your eggs and butter to come to room temperature before mixing. This will help create a smoother batter and result in a better texture for your blondies.
- Don’t Overmix the Batter: When combining wet and dry ingredients, mix until just combined. Overmixing can lead to dense and tough blondies.
- Check for Doneness: Start checking the blondies a few minutes before the recommended baking time. They are done when the edges are golden and a toothpick comes out clean or with a few moist crumbs.
- Cool Completely Before Cutting: Let the blondies cool completely on a wire rack before cutting. This helps them set, making it easier to cut into neat squares.
Variations
Different Nut Butter Options
You can switch peanut butter for other nut butters. Almond butter gives a nice flavor. Cashew butter adds creaminess and a mild taste. Sunflower seed butter works too if you need a nut-free option. Each change brings a new twist to your blondies.
Swaps for Chocolate Chips
If you want to mix it up, try using butterscotch chips or white chocolate chips. They add a sweet note that pairs well with peanut butter. You can even use dark chocolate chips for a richer taste. Experiment with different types to find your favorite!
Extras Add-Ins for Flavor Boost
Add-ins can take your blondies to the next level. Chopped nuts give a nice crunch. Swirling in some caramel or fudge makes them extra special. You can also toss in some dried fruit for a chewy texture. Get creative and make these blondies your own!
Storage Info
Best Storage Practices
To keep your peanut butter cup blondies fresh, store them in an airtight container. You can use a glass or plastic container with a tight seal. Place parchment paper between layers if you stack them. This helps to prevent sticking. Store the blondies at room temperature for up to three days. If you want to keep them longer, consider freezing.
How to Freeze Peanut Butter Cup Blondies
Freezing blondies is simple. First, let them cool completely after baking. Once cooled, cut them into squares. Wrap each square tightly in plastic wrap. Then, place the wrapped squares in a freezer-safe bag. Make sure to remove as much air as possible. You can freeze them for up to three months. When you’re ready to eat one, just take it out and let it thaw at room temperature.
Shelf Life and Reheating Suggestions
When stored properly, blondies last about three days at room temperature. If you freeze them, they can last for three months. To reheat, preheat your oven to 350°F (175°C). Place a blondie on a baking sheet and warm for about 5-10 minutes. This helps restore their soft, gooey texture. You can also microwave them for 15-20 seconds for a quick warm-up. Enjoy them warm for the best taste!
FAQs
What are blondies?
Blondies are bars made with brown sugar instead of cocoa. They look like brownies but have a rich, sweet flavor. The texture is dense and chewy. Blondies often include nuts, chocolate, or other mix-ins. They are a favorite treat for many!
Can I make these blondies gluten-free?
Yes, you can make gluten-free blondies! Just swap the all-purpose flour for a gluten-free blend. Many brands offer great substitutes. Look for one that works well in baking. This way, everyone can enjoy this tasty treat!
How do I know when blondies are done baking?
You can tell blondies are done when the edges turn golden brown. Insert a toothpick into the center. If it comes out clean or with a few crumbs, they are ready. Keep an eye on them, as they can bake quickly.
This blog post covered how to make delicious peanut butter cup blondies. We explored the ingredients, mixing methods, baking tips, and storage advice. You learned how to achieve great texture and avoid common errors. We also discussed tasty variations to customize your blondies.
In the end, these tips will help you bake amazing treats. Enjoy making every batc