Are you ready to impress your friends with a simple and tasty treat? Red velvet cheesecake bites are the perfect mix of rich flavor and creamy goodness. In just a few easy steps, you can whip up these delicious bites that look as good as they taste. Let’s dive into this fun recipe and enjoy the joy of baking something irresistible together!
Why I Love This Recipe
- Decadent Flavor: The combination of rich red velvet cake and creamy cheesecake creates a delightful flavor explosion in every bite.
- Perfect for Any Occasion: These cheesecake bites are ideal for parties, celebrations, or simply as a sweet treat to enjoy at home.
- Easy to Make: With simple ingredients and straightforward instructions, you can whip up these bites in no time.
- Customizable Toppings: Add your favorite toppings like chocolate chips or nuts to personalize these bites and make them even more delicious.
Ingredients
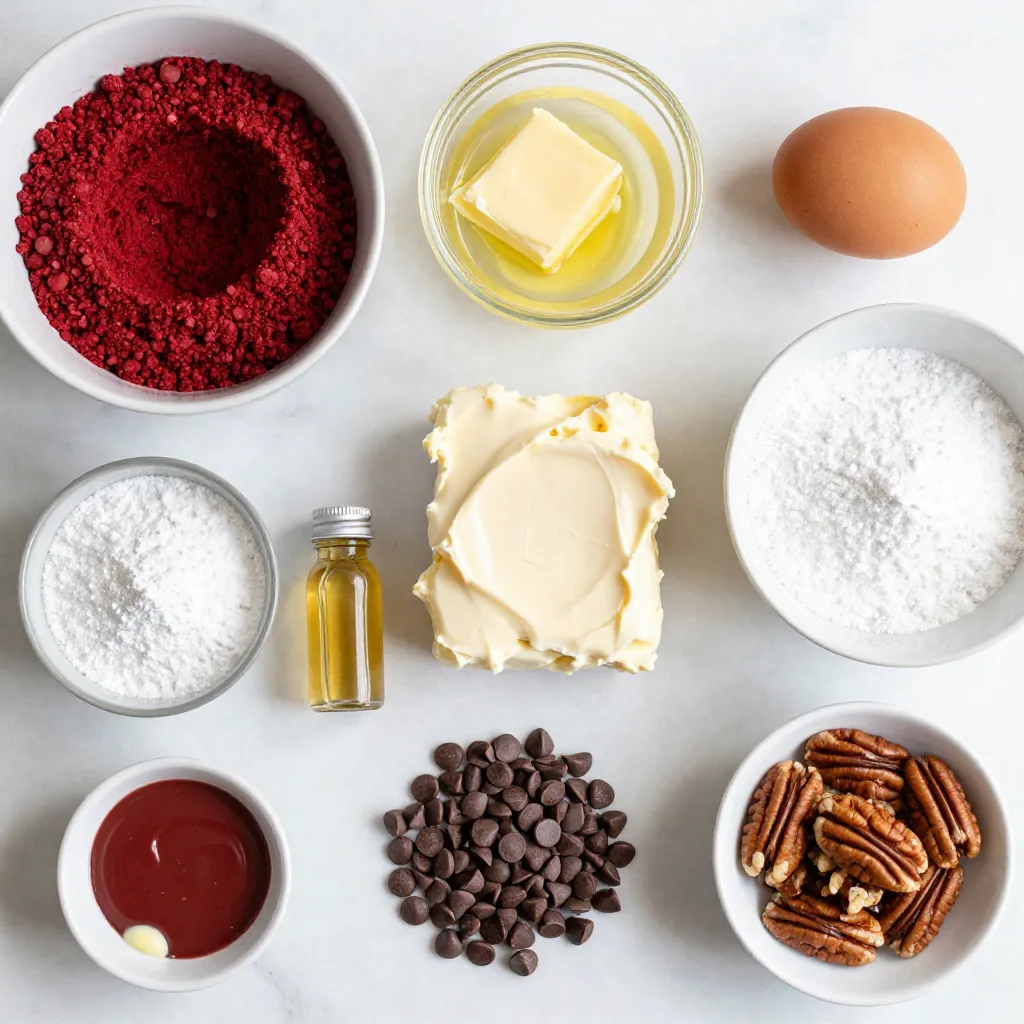
Main Ingredients for Red Velvet Cheesecake Bites
To make these tasty bites, you need:
– 1 ½ cups red velvet cake mix
– 1/2 cup unsalted butter, melted
– 1 large egg
– 8 oz cream cheese, softened
– 1/2 cup powdered sugar
– 1 teaspoon pure vanilla extract
These ingredients create the rich flavor and smooth texture of the cheesecake bites.
Optional Garnishes and Toppings
You can make your bites even better with these extras:
– 1/4 cup mini chocolate chips (for garnish)
– 1/4 cup crushed pecans or walnuts (for garnish)
– Red or white chocolate for drizzling
These toppings add crunch and sweetness to your bites.
Tools and Equipment Needed
To prepare your cheesecake bites, gather these tools:
– A mini muffin pan
– Paper liners or non-stick spray
– Mixing bowls
– Electric mixer
– Measuring cups and spoons
– Spoon for filling
Having the right tools makes the process smooth and fun!
Step-by-Step Instructions
Preparing Your Workspace and Preheating the Oven
Start by cleaning your workspace. A tidy area makes cooking easier. Preheat your oven to 350°F (175°C). This step is key for the bites to bake evenly. Grab a mini muffin pan. Line it with paper liners or spray it with non-stick spray. This will keep the bites from sticking.
Making the Red Velvet Cake Base
In a medium mixing bowl, combine 1 ½ cups of red velvet cake mix, 1/2 cup of melted unsalted butter, and 1 large egg. Whisk these ingredients together until you have a smooth batter. Make sure there are no lumps. This will be the base of your cheesecake bites.
Creating and Adding the Cheesecake Filling
In another bowl, take 8 oz of softened cream cheese. Add 1/2 cup of powdered sugar and 1 teaspoon of pure vanilla extract. Beat this mixture with an electric mixer until it’s creamy and smooth. This filling is what makes your bites so special.
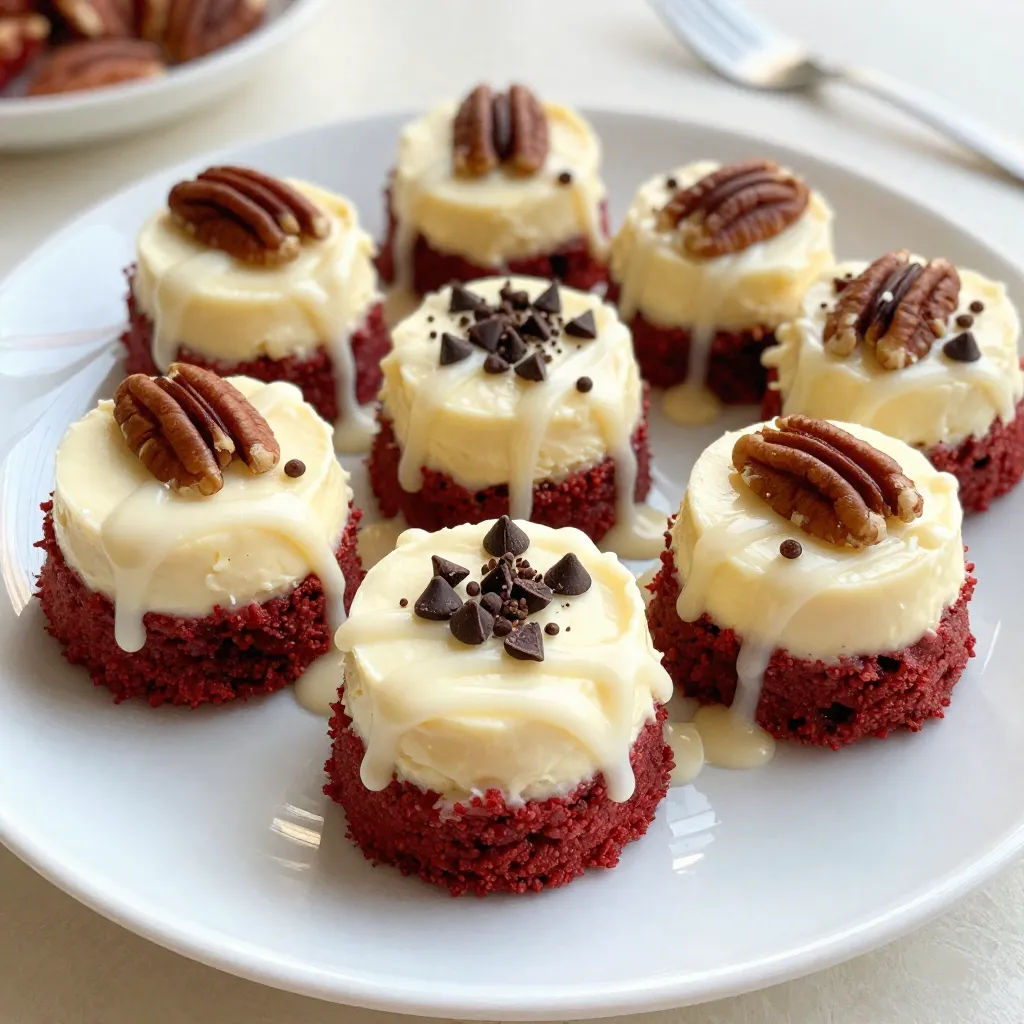
Assembly and Decoration of Cheesecake Bites
After the red velvet cakes have cooled, carefully take them out of the muffin pan. Spoon a dollop of the cream cheese filling onto each red velvet bite. Make sure to cover each one well. For toppings, sprinkle mini chocolate chips or crushed pecans on top for extra crunch. Melt red or white chocolate in the microwave. Drizzle it over the bites for a beautiful finish. Chill your bites in the fridge for at least 30 minutes. This helps the cheesecake filling set and the chocolate firm up. Enjoy your tasty treats!
Tips & Tricks
Best Practices for Baking Red Velvet Cheesecake Bites
To bake perfect red velvet cheesecake bites, always start with quality ingredients. Use fresh eggs and real vanilla extract. Measure your cake mix carefully to avoid lumps. Preheat your oven to 350°F (175°C) to ensure even baking. Don’t skip lining the muffin pan with paper liners. This helps with easy removal. Fill each cup only halfway to allow room for rising. Bake for 10-12 minutes. Check doneness with a toothpick.
Achieving the Perfect Cheesecake Filling Texture
For the cheesecake filling, soften the cream cheese well. Let it sit out for about 30 minutes before mixing. This step helps create a smooth texture. Use an electric mixer to beat the cream cheese, powdered sugar, and vanilla extract together. Mix until the filling is creamy and lump-free. If it seems thick, add a splash of milk to loosen it up. This will make it easier to spoon onto the bites.
Presentation Ideas for Serving
Make the bites look inviting by arranging them on a colorful platter. Chill them before serving for a fresh taste. Drizzle melted chocolate over the tops in fun patterns. Sprinkle crushed nuts or mini chocolate chips for added flair. These small touches make a big difference. You can also use decorative cupcake liners for an extra pop. Enjoy serving these treats at parties or special occasions!
Pro Tips
- Use Room Temperature Ingredients: Ensuring your cream cheese is at room temperature will help achieve a smooth and creamy cheesecake filling without lumps.
- Don’t Overmix the Batter: Mix the red velvet batter just until combined to prevent dense bites. Overmixing can lead to a tough texture.
- Chill for Better Flavor: Allow the cheesecake bites to chill for at least 30 minutes before serving. This will enhance the flavors and firm up the filling.
- Make Ahead: These cheesecake bites can be made ahead of time and stored in the refrigerator for up to 3 days, making them a perfect treat for parties!
Variations
Flavor Alternatives to Red Velvet Cake Mix
You can switch up the flavor of your cheesecake bites. Try using chocolate cake mix for a rich twist. Vanilla cake mix adds a light taste and pairs well with the cream cheese. For a fun twist, red velvet lovers can try adding some cocoa powder to the red velvet mix for a deeper flavor. These little changes can make a big difference in taste.
Vegan or Gluten-Free Options
Making these bites vegan is easy. Use a plant-based butter and replace the egg with a flax egg. For a gluten-free version, choose a gluten-free cake mix. Always check labels to ensure your ingredients fit your dietary needs. This way, everyone can enjoy these tasty treats!
Alternative Toppings and Fillings
You can get creative with toppings. Instead of mini chocolate chips, try crushed Oreos or sprinkles. Fresh fruit, like raspberries, adds a nice touch. For the filling, swap cream cheese with a dairy-free alternative. You can also add a splash of lemon juice for a zesty kick. These options let you customize these bites to your taste!
Storage Info
How to Properly Store Red Velvet Cheesecake Bites
To keep your red velvet cheesecake bites fresh, store them in an airtight container. Place a piece of parchment paper between layers to avoid sticking. This method keeps them moist and tasty for days. Make sure to refrigerate them, as the cream cheese filling needs to stay cold.
Freezing Tips for Long-Term Storage
If you want to save some bites for later, freezing is a great option. First, let the bites cool completely. Then, place them on a baking sheet lined with parchment paper. Freeze them for about an hour until firm. After that, transfer the bites to a freezer-safe bag or container. Label the bag with the date. They can stay good in the freezer for up to three months.
Shelf Life and Best Practices
Red velvet cheesecake bites last about 5 days in the fridge. To enjoy them at their best, eat them within this time. If you notice any changes in texture or smell, it’s best to discard them. Always check for any ice crystals if they are frozen. If you see them, the bites may not taste as fresh.
FAQs
How to make red velvet cheesecake bites without cake mix?
You can create red velvet cheesecake bites from scratch. Start with these simple ingredients:
– 1 ½ cups all-purpose flour
– 1 cup granulated sugar
– 1 teaspoon cocoa powder
– 1 teaspoon baking soda
– 1 teaspoon baking powder
– 1 cup buttermilk
– 1/2 cup vegetable oil
– 2 large eggs
– 1 tablespoon red food coloring
– 1 teaspoon vanilla extract
Mix all the dry ingredients in one bowl. In another bowl, whisk the wet ingredients. Combine both mixtures until smooth. This method gives a fresh taste, and you control the quality.
Can I use cream cheese frosting instead of the cheesecake filling?
Yes, you can use cream cheese frosting. It will give a sweet touch to your bites. However, remember that frosting is sweeter and thicker than the cheesecake filling. This change can alter the texture. If you prefer a sweeter bite, this is a fun option.
What is the best way to reheat the cheesecake bites?
To reheat cheesecake bites, use the oven. Preheat it to 300°F (150°C). Place the bites on a baking sheet. Warm them for about 5-10 minutes. This method keeps them soft without making them too hot. Avoid the microwave, as it can make them rubbery.
How can I ensure the cheesecake filling sets properly?
To help the cheesecake filling set, chill it well after assembly. Refrigerate the bites for at least 30 minutes. Adding a bit of extra powdered sugar to the filling can also help it firm up. Ensure your cream cheese is at room temperature for a smooth mix.
Red velvet cheesecake bites are a delightful treat that combines rich flavors and textures. We covered the main ingredients, preparation steps, handy tips, tasty variations, and storage tactics. These bites are fun to make and even better to share. Remember, with practice, you can perfect this recipe and impress your friends. Explore the alternatives and make it your own. Enjoy your baking and savor each bite of your delicious creatio